Category Archives: Food

SAMSUNG

I scream you scream we all scream for ???

Rhubarb berry ice cream, anyone?

It’s summer, it’s hot, and I am going to eat ice cream. The store-bought stuff is fine, but have you tried reading the labels lately? Poly-what? Hydrolyzed who? I flunked organic chemistry in college, so I really can’t decipher what I’m eating. And forget about the reduced fat or reduced sugar varieties — UGH. So if I’m going to eat ice cream, why not make it out of ingredients I can pronounce and seasonal flavors that really tickle my palate?

As a child, we had one of those old-fashioned Ice+salt wooden-crock hand-crank ice cream makers. Us kids would beg and beg and beg for ice cream, my parents would say no we never crank long enough, we would promise to crank and please oh please and finally, yes, my parents would give in. Each of us kids (there were three of us) would crank for about 2 minutes, plead total exhaustion, and then my poor dad would be stuck cranking that thing for 45 minutes by himself. The ice cream was wonderful, but it was understandably about a once-a-year treat.

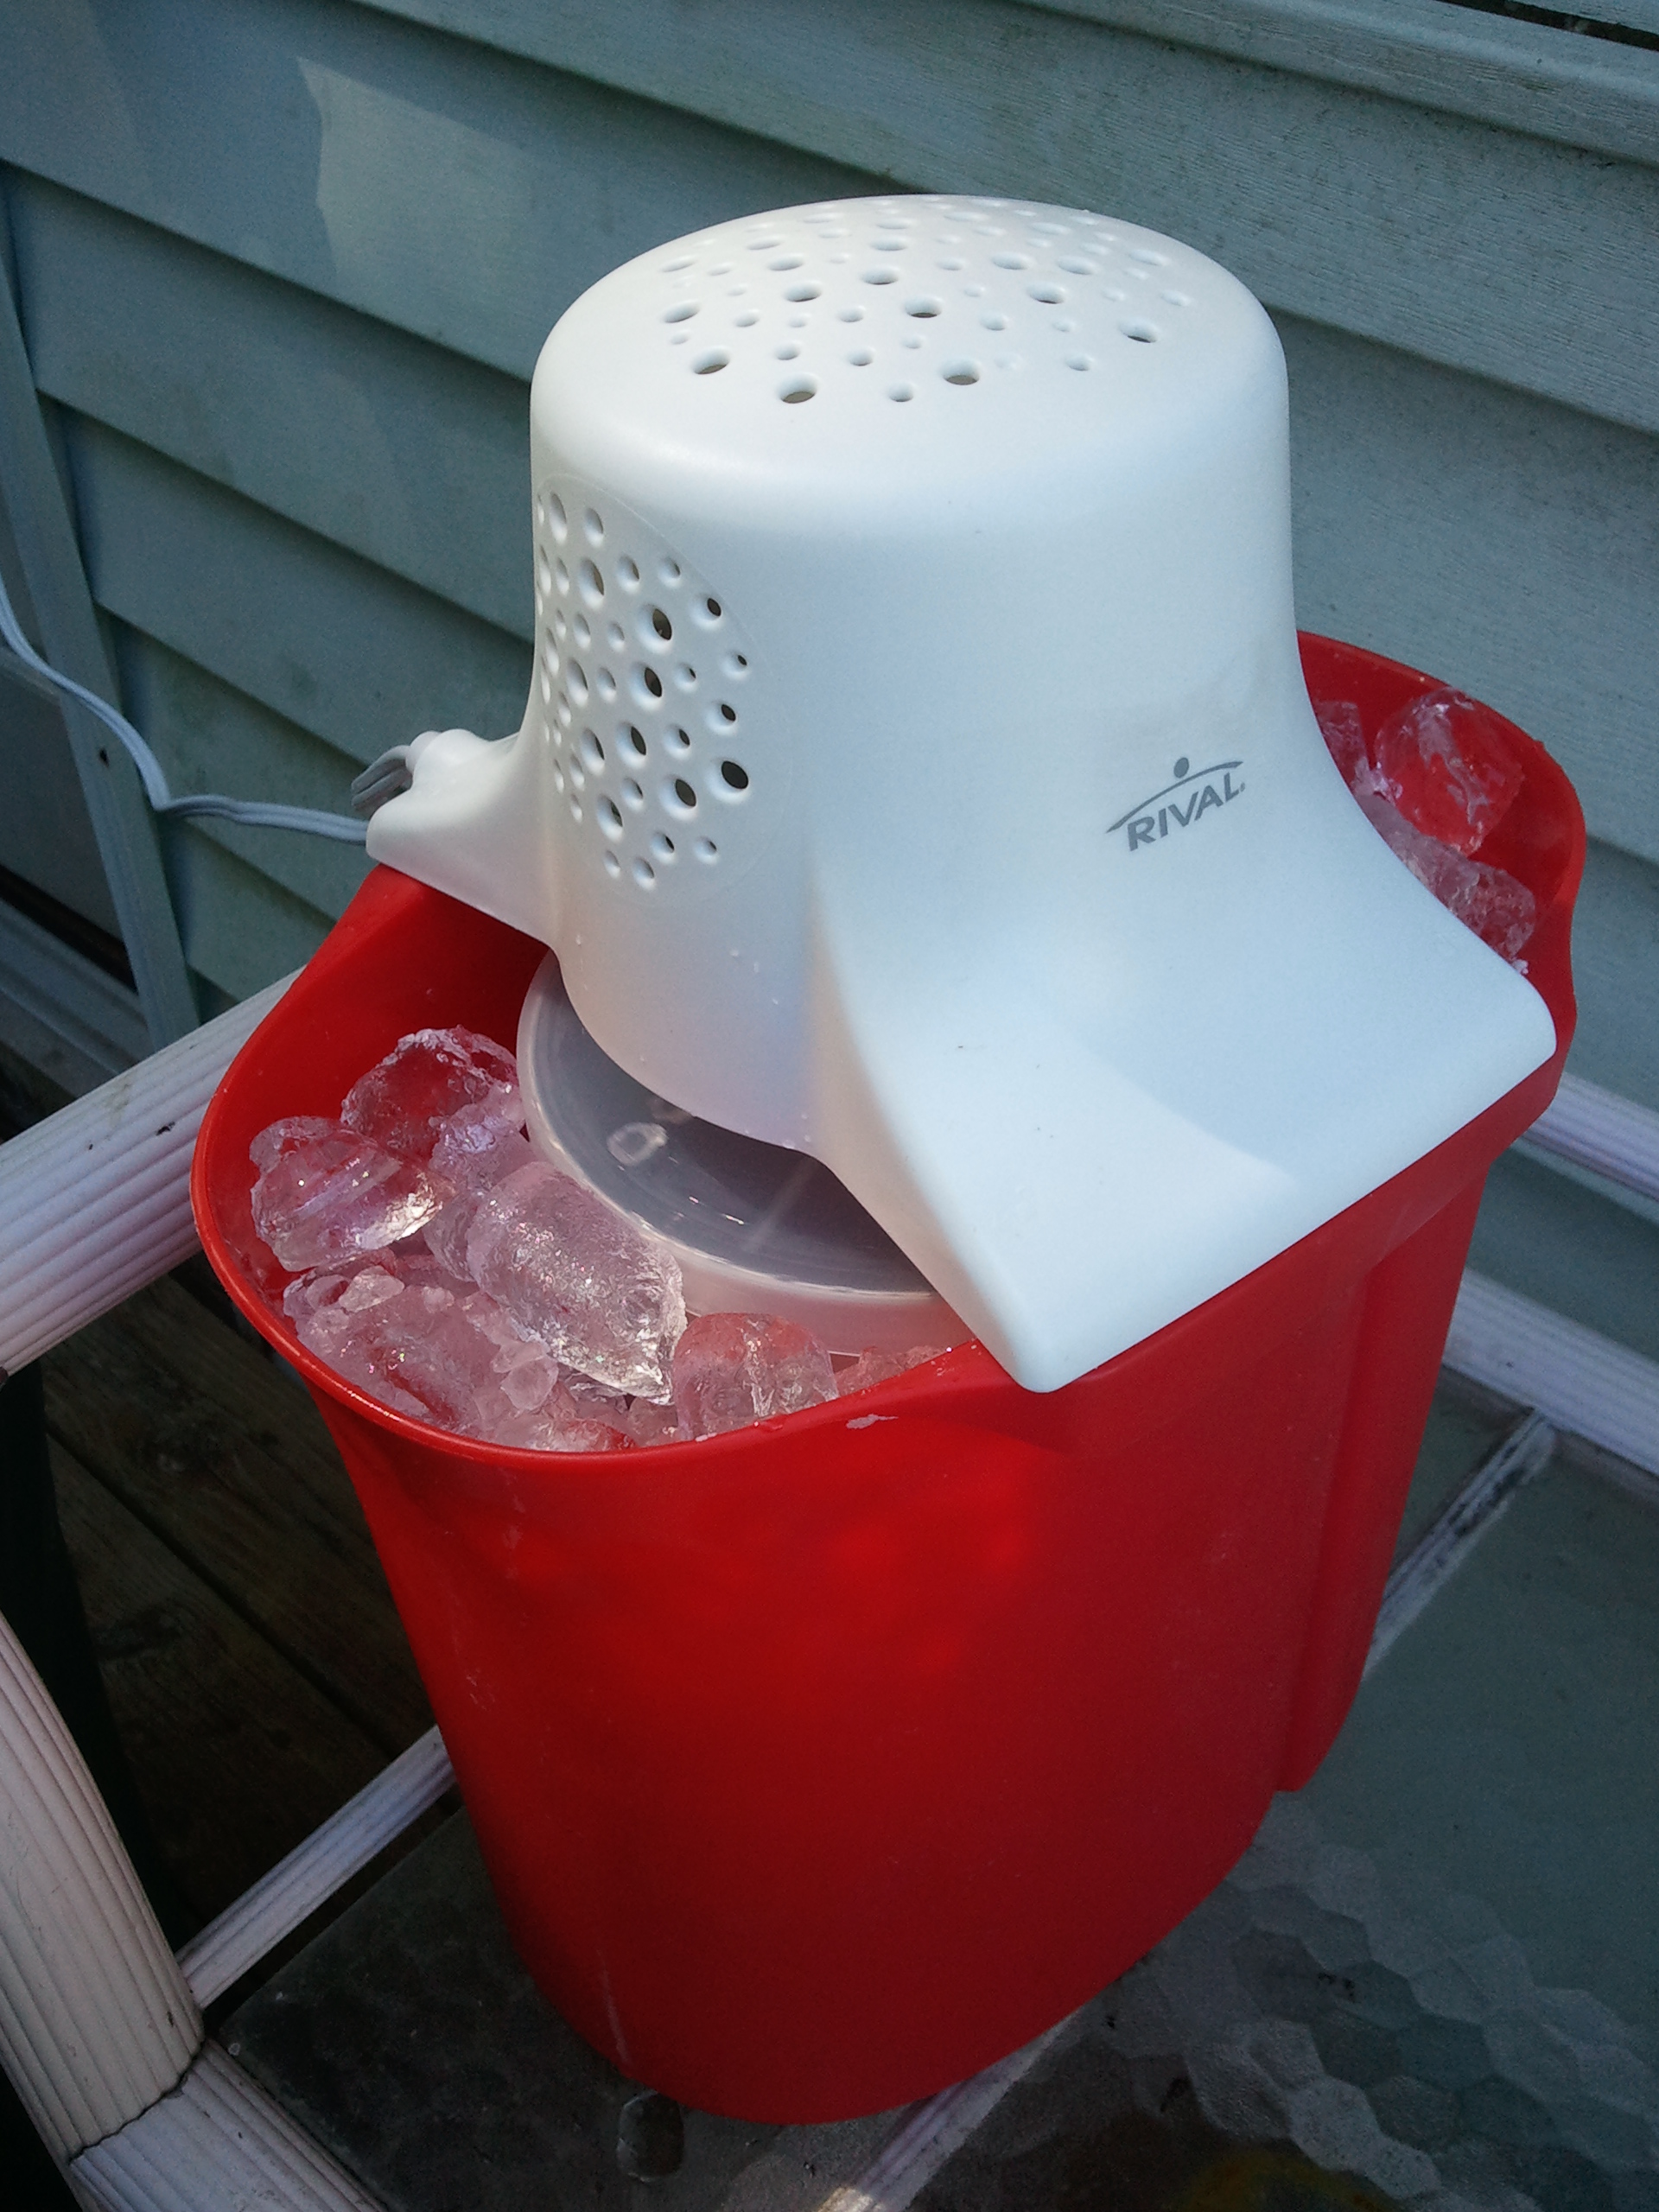
As a young adult, I bought one of those small units where you freeze a special bowl and then make ice cream in it. I could never get my freezer cold enough, so the ice cream never really froze fast enough or hard enough, so it was a bit of a disappointment. Fast forward to my **ahem** later adult years, and I decide to acquire one of those ice+salt machines, but an ELECTRIC one. They run about $40. My first one died after just a few batches but my current one seems to be going strong.

SAMSUNG

So my latest ice cream confection truly is blogworthy. I started by making a compote of rhubarb and mixed berries at my brick house mid-week (it was very tasty on its own and would have been awesome over waffles, french toast, or vanilla ice cream). I refrigerated it for a couple of days before transporting it to the beach house on a Friday night. That Saturday, I combined the compote with the ice cream base and froze me up some ice cream.

Rhubarb and Mixed Berry Compote

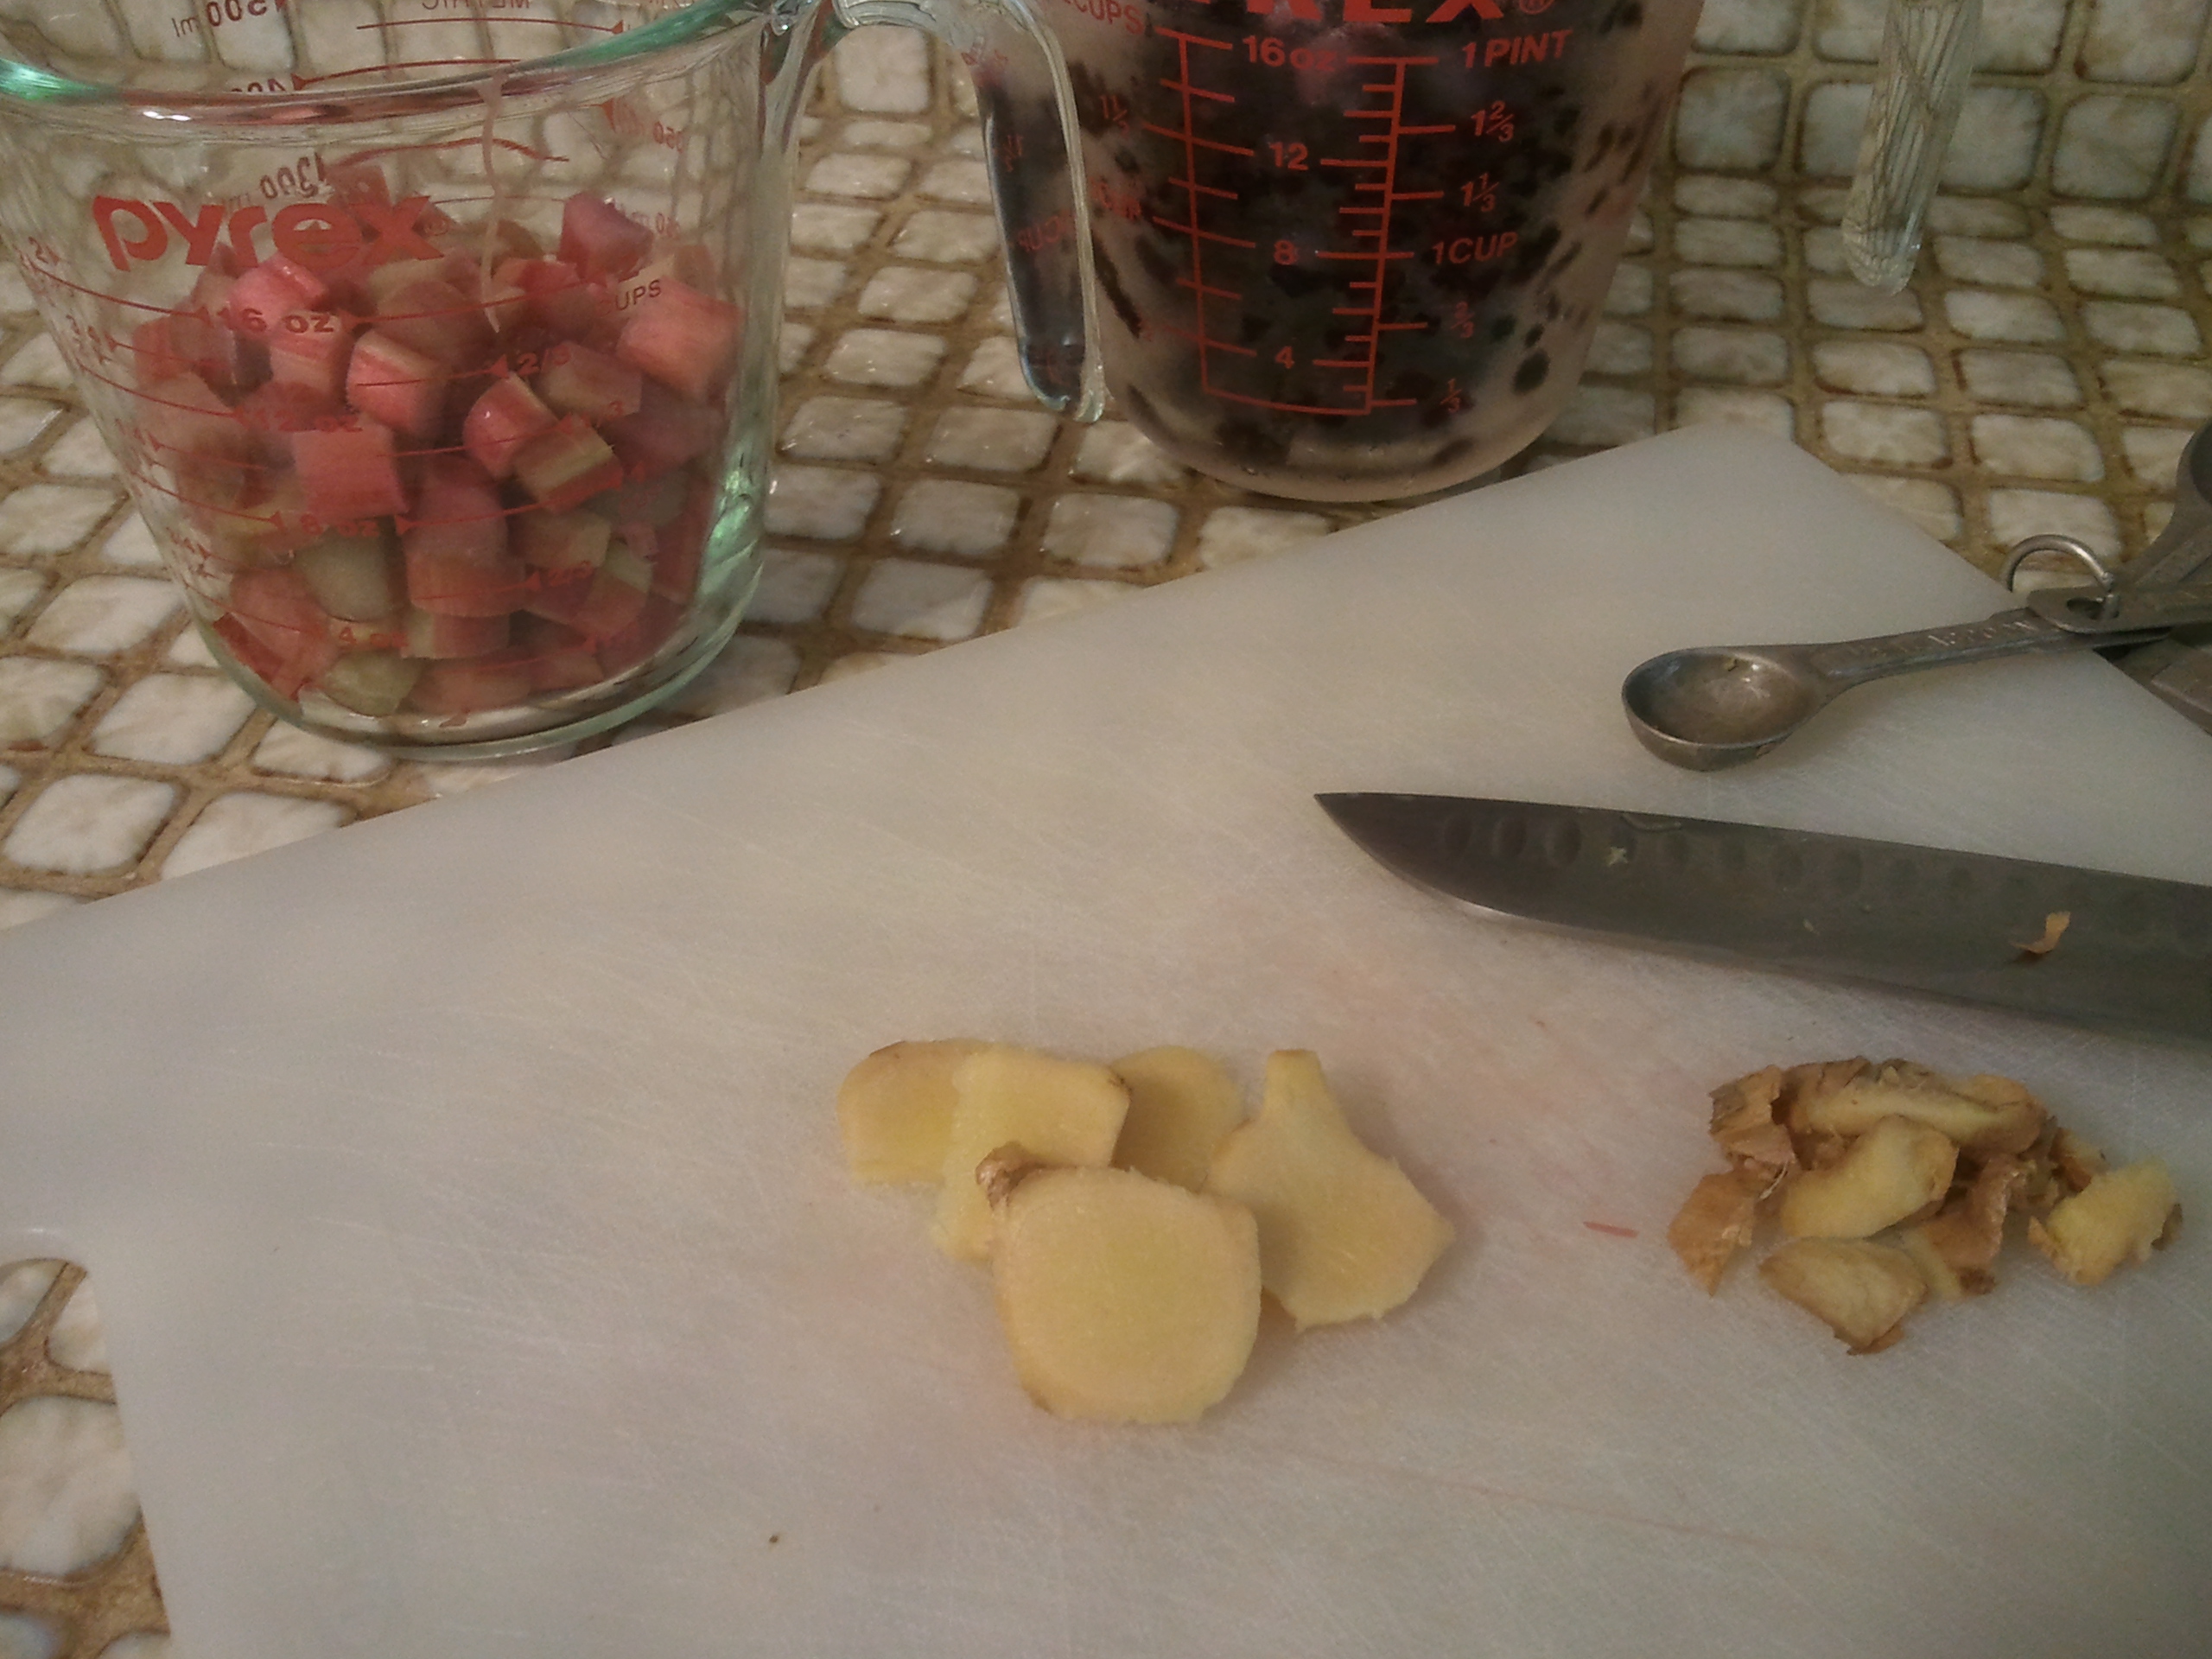
1 cup chopped rhubarb
2 cups berries (I used a frozen cherry, blackberry, black raspberry, blueberry mix)
1 cup sugar
1 tablespoon lime juice
1 hunk peeled ginger, about 3/4 inch, cut into several thin rounds (COUNT HOW MANY)
1/4 cup water

Combine all in a non-reactive saucepan. Bring to a low boil over medium heat. Turn heat down and simmer gently for 5 – 10 minutes until the rhubarb is tender but not mushy and the liquid has turned syrupy. If you taste the rhubarb it should have absorbed some of the sugar but still retain some tartness. Let cool to room temperature. Fish out the ginger rounds (that’s why you have to count them). Refrigerate several hours before using to make ice cream.

SAMSUNG SAMSUNG

Ice Cream Base
Adapted from Sweet Cream Base #1, Ben & Jerry’s Homemade Ice Cream & Dessert Book
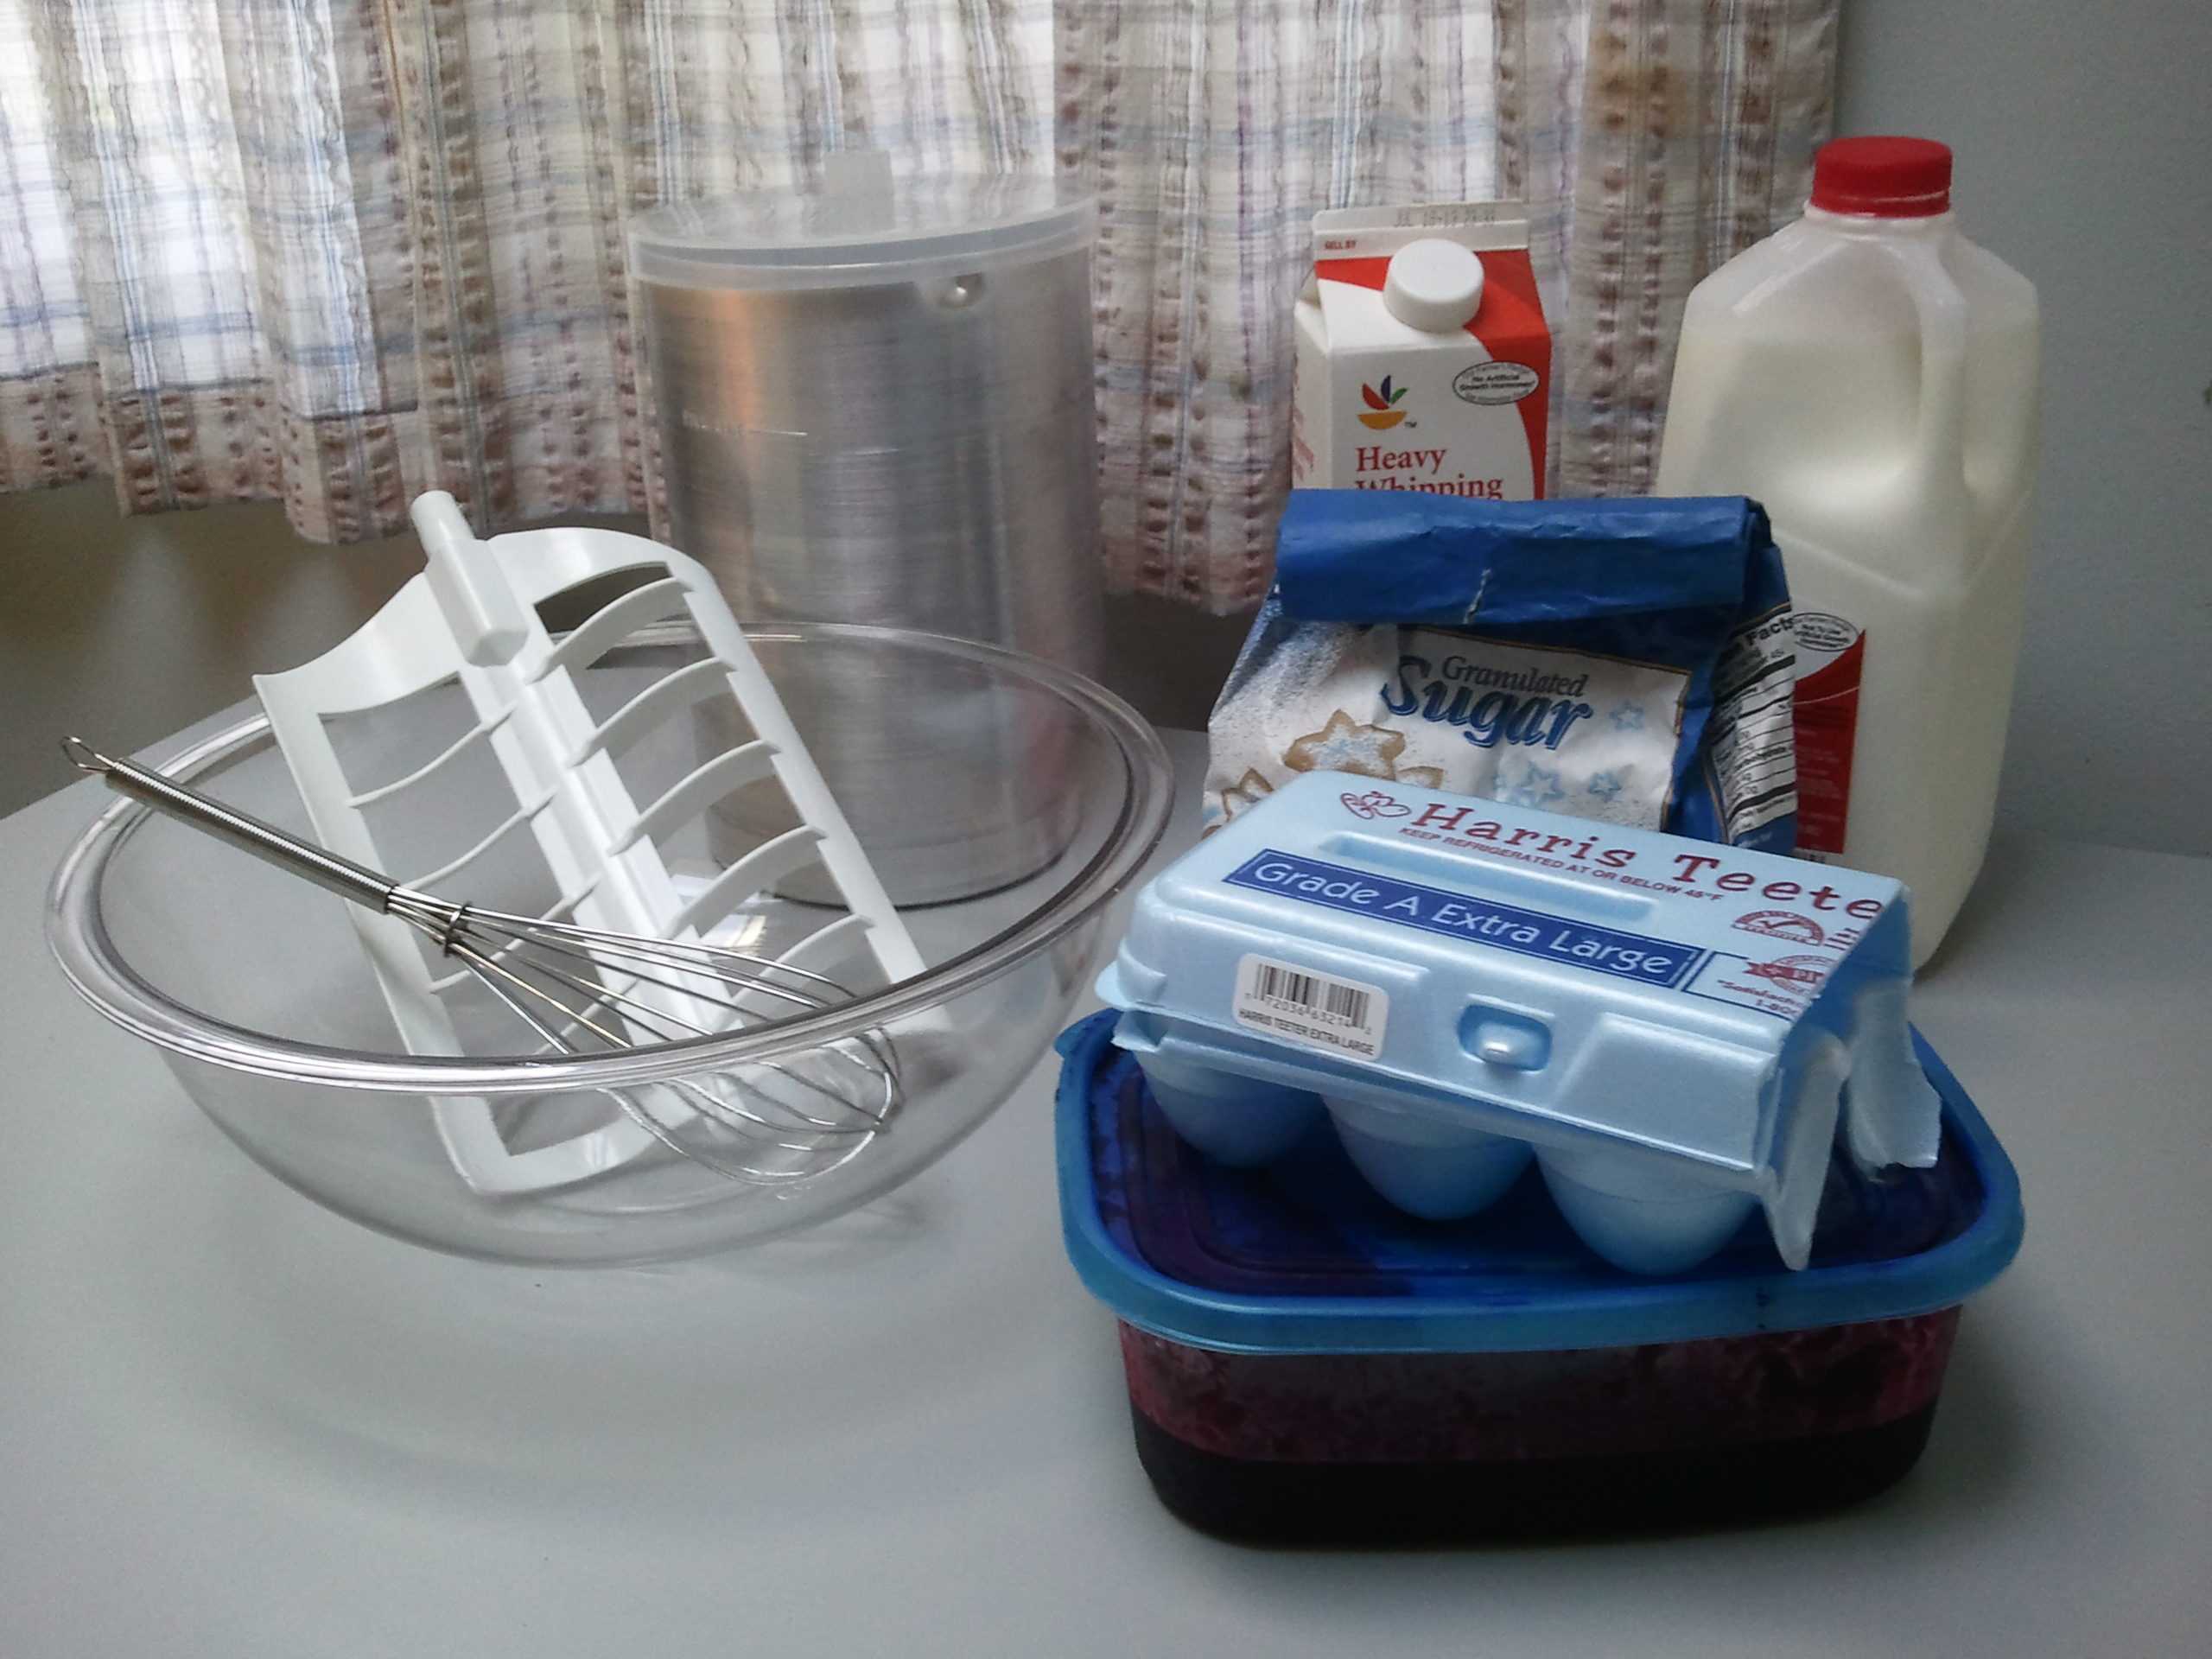
SAMSUNG
3 extra-large eggs
Yolk of 1 extra-large egg
1 1/2 cups sugar
4 cups heavy cream
2 cups whole milk


Whisk the eggs in a HUGE bowl until light and fluffy. Add the sugar gradually, whisking like crazy. Add the cream gradually, whisking gently to combine. Add the milk gradually, whisking gently to combine. Add the refrigerated compote, stirring gently to combine.

Freeze according to your manufacturers instructions. These quantities are appropriate for a 4 quart ice cream maker.

*****

I was a little short on ice and too lazy to drive back down to the liquor store to buy more, so my ice cream did NOT thicken/freeze in the ice cream machine as much as I would have liked. No worries — I just scooped it into a couple of large plastic containers, leaving headroom, and froze the covered containers in my VERY cold home freezer. Even if it had thickened to the consistency of soft-serve, which is about what I get out of my machine, I still would have had to harden it off in the freezer. It’s just part of the process.

SAMSUNG

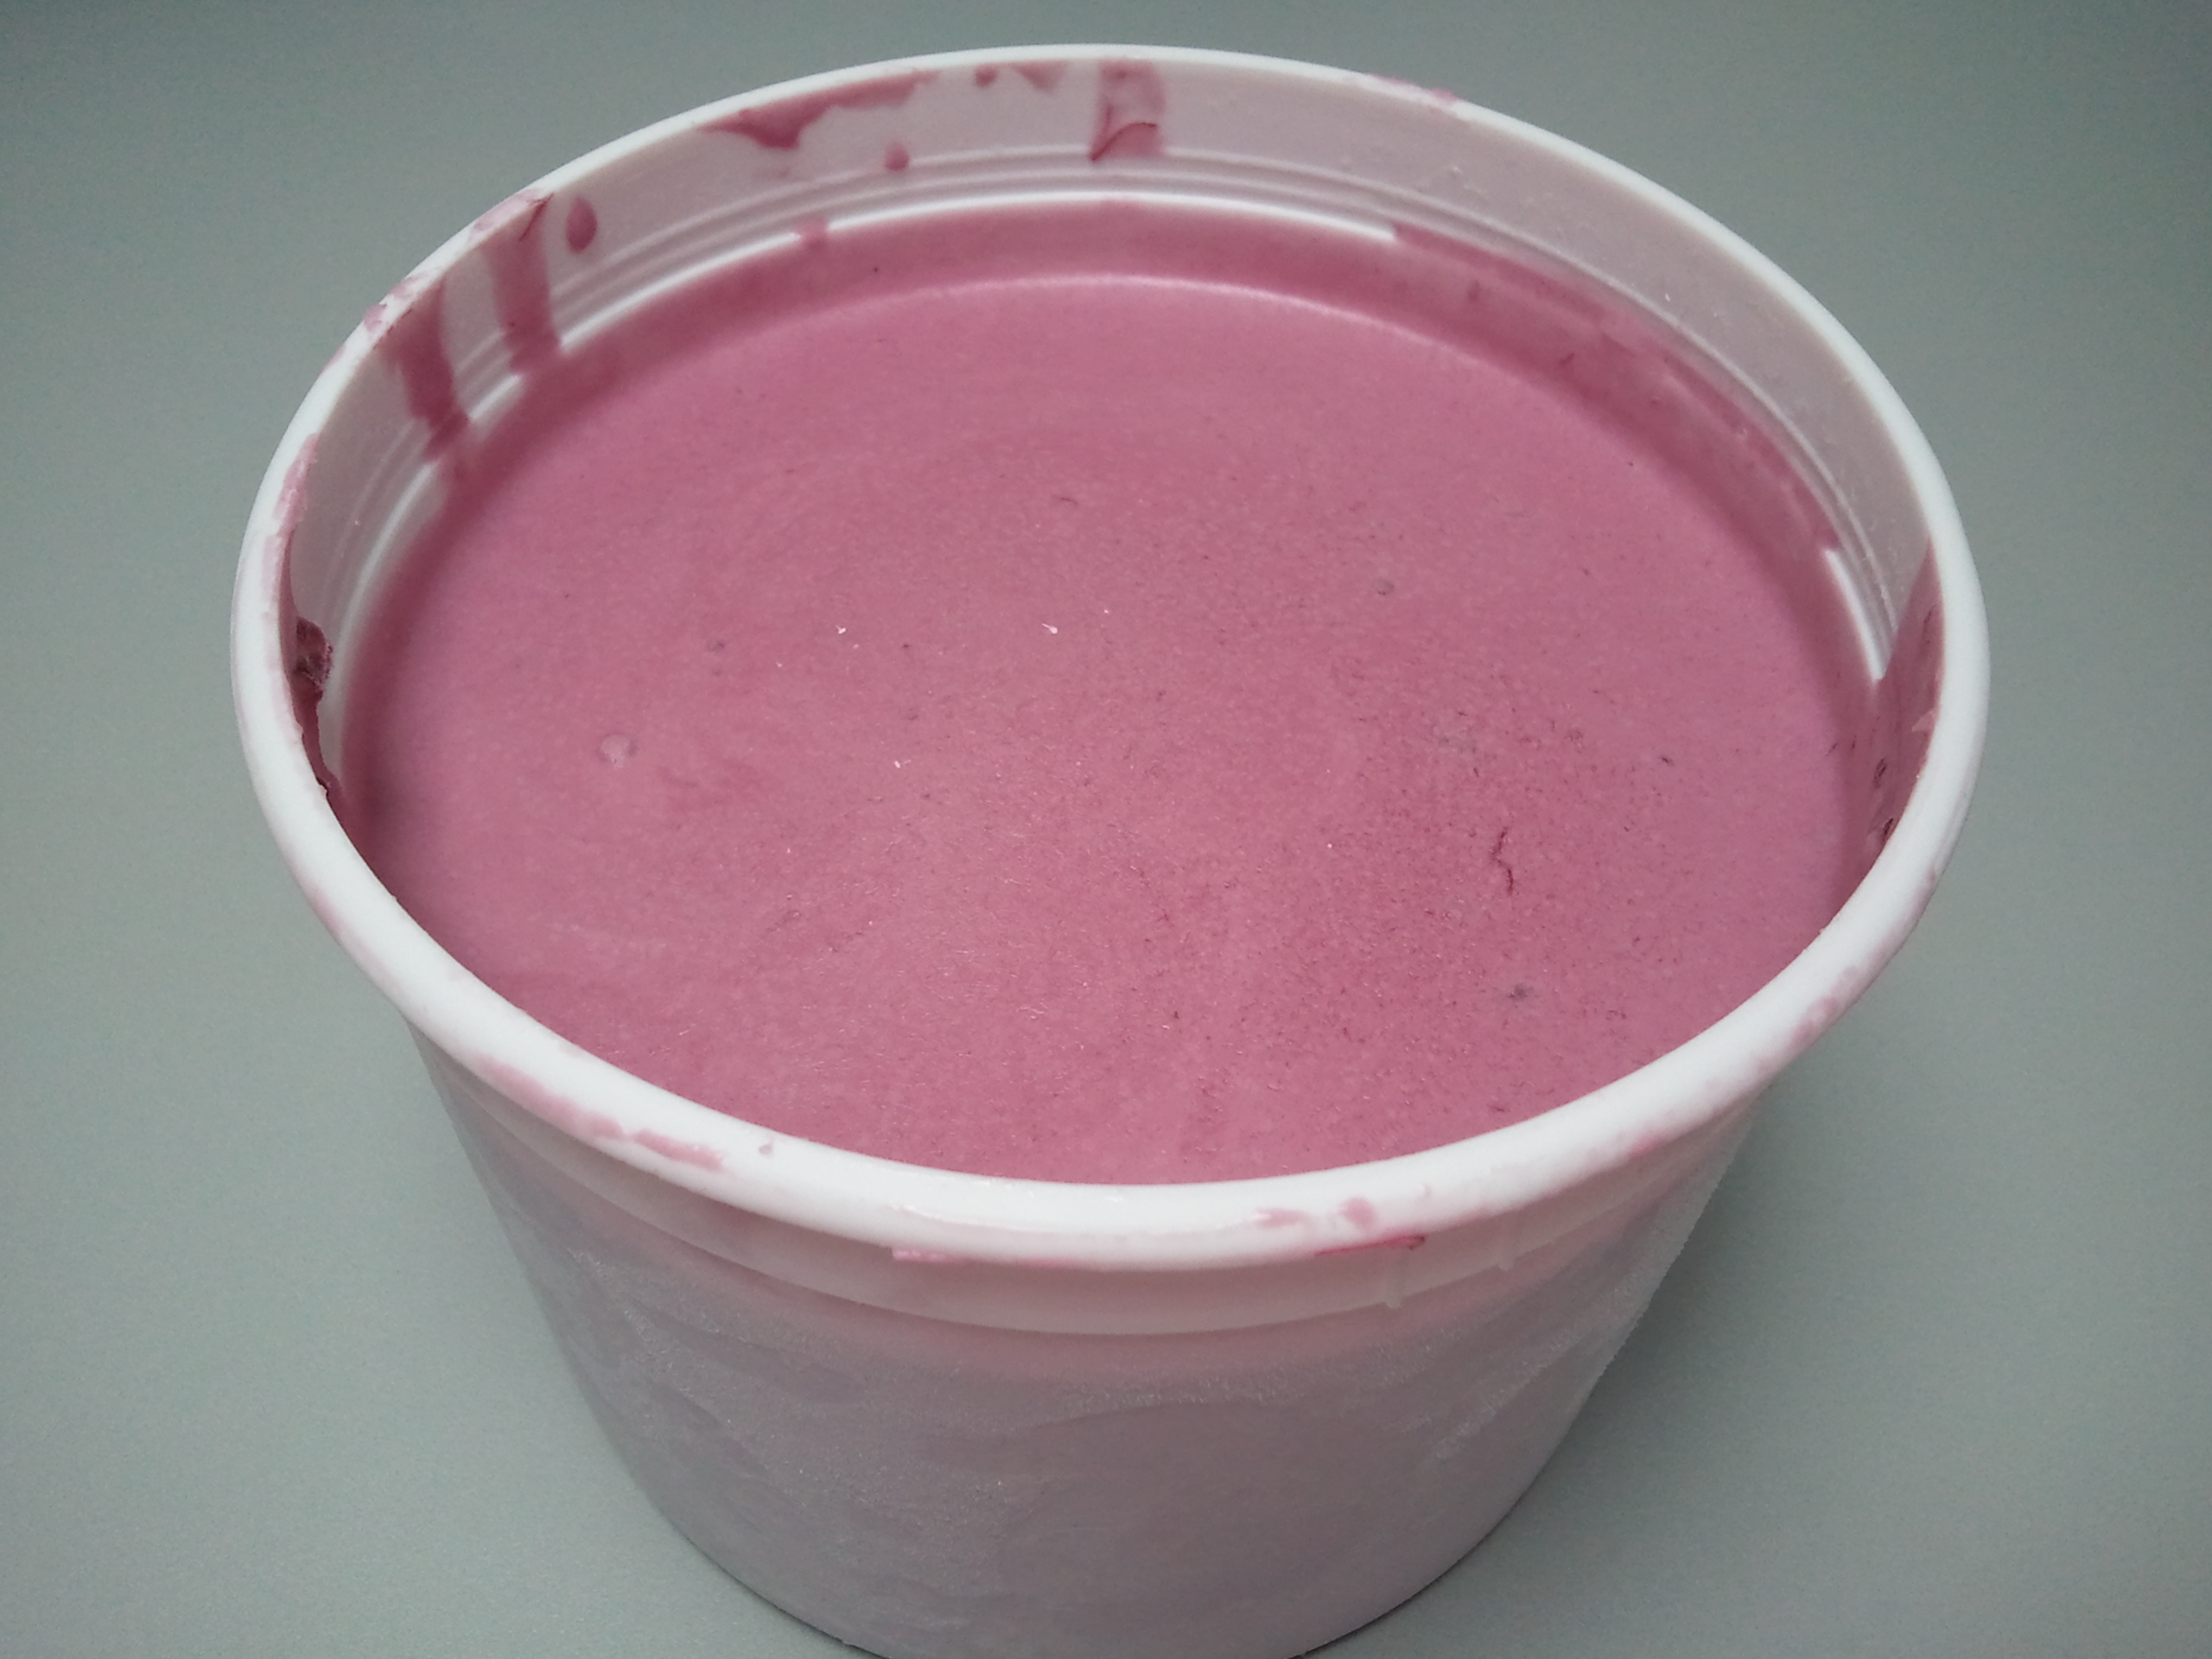
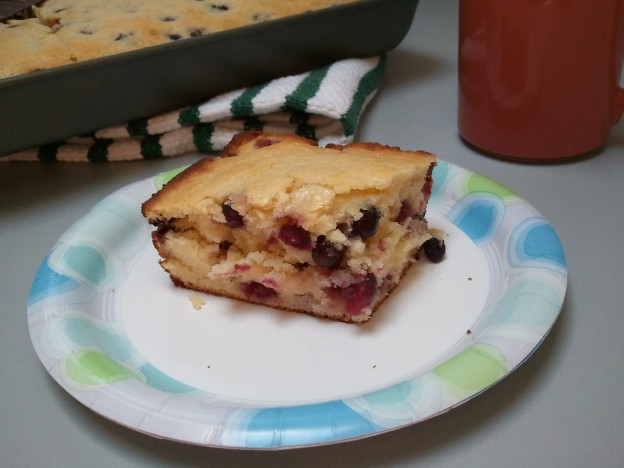
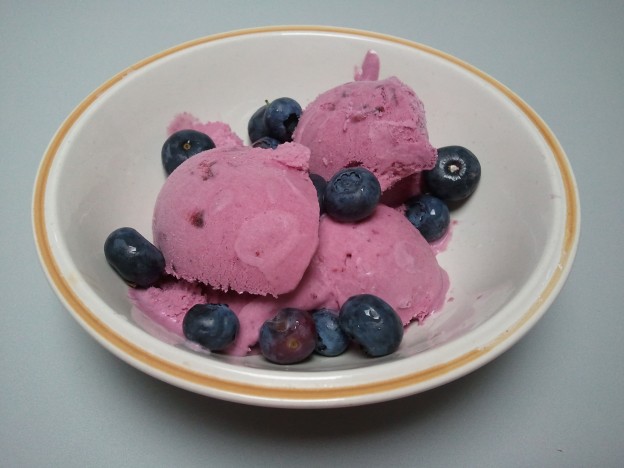
I served the ice cream with fresh NJ blueberries.

*****

I made this ice cream a few weeks ago, using fresh strawberries rather than the mixed frozen berries in the compote. I also added some uncooked fresh strawberries to the base. It was delicious, but not nearly as colorful. Also — the uncooked strawberries tend to get a little hard when they freeze, but the cooked ones had soaked up some sugar and remained softer after freezing. I’m now sold on the idea of pre-cooking the fruit with sugar for ice cream.

[photo credit: P. Sue Kullen]

Food Porn: Standing Rib Roast

[photo credit: P. Sue Kullen]

So a couple of weekends ago, we made plans to have dinner up on the cliff at a friend’s house. While our cottage has cute peek-a-boo views, the cottages along the cliff have AMAZING 180 degree views of the Chesapeake Bay. So we bribed our way up there by saying we’d cook a hunk of meat if they’d provide a starch and a dessert. Having sampled my husband and my grilling efforts in the past, well, it wasn’t a hard sell — they knew they were in for a treat.

So off I go to Nick’s, my butcher of choice down at the beach. Standing Rib Roast was On Sale. OMG, we love standing rib roast. And everyone we’ve ever served it to now LOVES standing rib roast, too. It’s a beautiful cut of meat — the ribeye steak still on the bone. What’s not to love? So the meat guy and I have a discussion. A whole section is 7 ribs, but that’s too big for my V-rack. He can cut 2, 3, 4, or 5 ribs, or sell me the whole 7. He wants to know how many people I’m serving, I say four, but I want leftovers. He thinks 3 ribs is sufficient — HA!! I hold my hands up in the air, approximately the width of my V-rack, and we decide that’s 5 ribs. So off I march with a 12 pound rib roast. Now I know this will feed 10 – 12 people, easy (okay, 8 if they are Big Eaters), but I really don’t know how many people are coming to dinner, and I really DO want leftovers, because remember, we LOVE standing rib roast. And I won’t have to cook Sun, Mon, or Tues because I’ll keep serving my main carnivore the leftovers.

Once we get home, Keith fires up the grill. We are aiming for a nice gentle indirect 350F. Inside, I let the roast rest outside the fridge for about 30 minutes, then rub with extra virgin olive oil followed by a generous dose of spice rub (kosher salt, black pepper, dried rosemary, dried thyme, and dried garlic, ground to a fairly fine powder in a coffee grinder). I place this monster in the V-rack, bones down, fat side up:

SAMSUNG SAMSUNG

Keith has configured our Big Green Egg for indirect grilling with a plate setter. We put the meat on, shut the lid, and begin our clock-watching. As Keith likes to say, “If you’re Lookin’, you ain’t Cookin’!” So we won’t crack the lid until the 90 minute mark. By now, I know I’m serving at least seven, so this beast doesn’t seem quite so gratuitous after all!

We pop the lid at the 90 minute mark and take the internal temp with my $5 meat thermometer from the grocery store. It doesn’t even register the lowest temp at 130F! No worries — it’s early by my calculations, so we shut the lid and continue drinking the strawberry mojitos I’d mixed to keep us occupied. At the 2 hour mark we check again — barely registering! I’m getting a little nervous, since we’re now 1/2 hour late to the appointed dinner hour, and I still have to grill the romaine lettuce, and oh no we are done with the mojitos. On the other hand, I know that internal temps can JUMP considerably in a short period of time right at the end, so I’m not panicked. About 15 minutes later we check again, and it’s the magic 140F to 145F we were aiming for! I know that sounds pretty rare, but there will be a significant amount of carryover cooking as this beauty rests for 20 or 30 minutes, so we’ll have more done sections at the ends and a mmmm mmmm rare at the center of the roast. Trust me — that’s when you need to pull this.

So we pull it, put the V-rack and all on a cookie sheet, tent with aluminum foil, and he hauls this hunk-o-beef up the hill (he’s an amateur strongman don’t worry about him). I quickly cut the romaine hearts down the center, drizzle with olive oil, kosher salt, and pepper, and place cut side down on the still hot grill (Keith had kindly removed the plate setter so I’m set up for direct grilling). Keep on the grill long enough for marks, flip over, and char the other side. You don’t want to wilt the entire head — just get some color and carmelization. I pull these, tent with foil, and race up the hill.

What a feast! We had potato salad (sour cream!), red cabbage slaw (vinegar not mayo!!), sesame green beans, and roasted beets to accompany the roasted beef and balsamic-drizzled romaine. Our host pulls out a bottle of pinot noir saying we ought to drink red, but this was her only bottle. Keith excitedly asks “Michelle Michelle remember that wine?!?”, reminding me of three bottles of wine I’d been saving for a night of fine food and friends — THIS was the night!

Okay — side note — I was married once before. As part of the amicable division of assets, we had to split our modest “wine collection”. I’ve long since consumed most of what I got, but I had 3 bottles of Dry Creek Vineyard wine hanging around, waiting for the right occasion. I had ’94, ’95, and ’97 Old Vines Zinfandel. These weren’t high-end wines, but I had visited the vineyard in person, and probably carried one of these bottles back on a plane (back when you could), so they held great sentimental value. And I REALLY wanted to drink them all at one time, so I could compare them.

So we drank the wines in a row with this feast of a meal. I was a little worried — because I don’t have proper storage facilities — but the wines had held. The ’94 was amazing. The ’95 was very similar to the ’94, but just a touch more delicious! The ’97 was lovely, but didn’t quite compare to the ’94 and ’95. It is such a treat when a meal and the wine complement each other so well. And the view — OMG — the view! A night to treasure.

Which is why I have so few photos — we weren’t thinking about blogging or Facebook. We were enjoying the company, the food, the wine, the view, the weather … truly a confluence of all the reasons we cook for loved ones.

I do have one more quick photo, the leftovers we had back at the brick house:

SAMSUNG

SAMSUNG

Blogworthy?

So the current joke at our house is whether or not something is “Blogworthy” (for those of you of a certain age, you might recall Elaine of the TV show “Seinfeld” using the term “Spongeworthy”). It started out innocently enough, when I announced on a Friday that I intended to cook something “Blogworthy” over the weekend. So when my husband ate his yogurt, he asked if it was “Blogworthy.” When he poured a glass of ginger ale, he asked if it was “Blogworthy.” And so on. That didn’t last long, FORTUNATELY, but now it’s our little joke about whether a dish or a meal is merely ordinary or something extraordinary and worth sharing with others (he is very supportive of my blogging and he’s even getting a little more patient about the picture taking).

So at our little beach cottage, my husband has planted a few old-fashioned fruit-bearing bushes that begin to bear fruit right about NOW. We have Gooseberries, Currants (both red and black), and a Service Berry (my Mom calls it Sarvis Berry — both are correct). These are nice to eat out of hand but what he REALLY loves is a not-too-sweet bread chock-full of the fruits of his labor. So he tasked me to make him some Blogworthy Bread with our current crop of Service Berries.

This recipe is the same basic recipe I’ve posted recently, but I took more of a dump approach with the ingredients — it’s a VERY forgiving recipe. My husband ate at least half of this bread over the course of two days. Me and a couple of friends had some with some leftover home-made strawberry rhubarb ice cream. We all pronounced this bread BLOGWORTHY.

Service Berry Breakfast Bread

SAMSUNG2 cups Service Berries (aka Sarvis Berries)
2 1/2 cups flour
2 1/2 teaspoons baking powder
1/2 teaspoon salt
1/2 cup butter, melted and cooled slightly
1 cup sugar
2 eggs
Juice and zest of 1 lemon
1 cup buttermilk

Preheat oven to 375F. Prepare an 11 x 7 x 2 inches baking pan by spraying liberally with baking spray.

Rinse your berries and pick over for stems, leaves, and small bugs. Drain well. Sprinkle about a tablespoon of the flour over the berries and gently shake them around to coat lightly.

In a small bowl, whisk together the remaining flour, baking powder, and salt. Set aside.

In a large bowl, mix the butter, sugar, eggs, lemon juice, lemon zest, and buttermilk until well combined. Dump in the dry ingredients and mix by hand until incorporated. I started with the whisk and ended with a rubber spatula.

Gently fold in the berries. Pour the batter into the prepared pan.

SAMSUNG

Bake the loaf at 375F for 15 minutes. Rotate the pan and cook another 15 to 20 minutes until golden brown and a toothpick inserted into the center comes out clean (or with only a few crumbs).

Allow to cool to warm before cutting — this is a VERY moist bread and if you cut into it too soon, it will be gummy. Store tightly covered at room temperature, not that it’s going to last very long!

SAMSUNG

*****

You could substitute fresh blueberries for the service berries.

SAMSUNG

Quick Crab Fix

I love me some crab. Especially our beloved local Maryland Blue Crab. Hardshell, softshell, crab cakes, crab balls, lump, backfin, soup, bisque, chowder … you name it, I’ll eat it. Picking crabs is a lovely way to spend a hot summer afternoon, sitting at a picnic table covered in paper bags, cold beverages at hand, but it is HARD work and that crab fights back! Sometimes you just want to take it easy and get your crab fix without the nicks and cuts, right?

This weekend, my local market had some imported crab on sale. I grabbed a tub with the idea that I was going to make a hot crab dip, an idea that got discarded as soon as I got my sailing invitation! [It was a perfect day for sailing and I am grateful for my friends with sailboats!] Instead, I grabbed a few items from the fridge and pantry and threw together a crab dip that came together quickly and went down just as fast.

Spicy Cold Crab Dip
Serves 4 as an appetizer

SAMSUNG1 small container (5 – 6 oz) plain greek yogurt (I used nonfat)
2 tablespoons mayonnaise (I used “light”)
1 tablespoon bottled key lime juice (I use “Nellie and Joe’s”)
1 – 2 teaspoons of diced hot cherry peppers, to taste
1/2 teaspoon chili powder (medium), to taste
Salt and fresh ground black pepper, to taste
8 oz crab, carefully picked over
3/4 cup finely shredded cheddar cheese (I used a bagged “Mexican” 4-cheese blend)

SAMSUNG
Combine the yogurt, mayonnaise, lime juice, cherry peppers, chili powder, a pinch or two of salt, and cracked pepper in a bowl. Taste for seasoning — you are looking for a little zing not a slap in the face, but you may find you need a tad more hot peppers or chili powder. Add more salt SPARINGLY, since the cheese and crab will be somewhat salty themselves.

Gently pick and finger through the crab, extracting all the shell and cartilage you find, without breaking it up too much. Gently fold the crab and the cheese into the yogurt mixture. Refrigerate until ready to use. Serve cold with a sturdy dipper, like tortilla chips or pita chips. IF there’s any leftover (HA!), eat it within a day.

OLYMPUS DIGITAL CAMERA

[photo credit: Steve Kullen]

*****

Fresh crab is highly perishable. Keep it refrigerated until you are actually using it.

I used an imported crab labelled “lump” that my market sold at a “backfin” price. Don’t use the $20/lb+ lump in this dip — save that for crabcakes!

I made a variation the day before with NO salt and Old Bay instead of chili powder — also a home run! I went with chili powder rather than Old Bay this time because one of my guests is gastro-sensitive to some unknown component of Old Bay. Honestly — I think I liked the chili powder better :)

*****

7/25 update: Over the Fourth, I made a double batch that (surprisingly) wasn’t consumed within a couple of days, so I froze the leftovers. Early this week, I pulled it out of the freezer to partially thaw, threw it in a shallow baking dish (prepare with baking spray first!), and then threw THAT into a 350F oven until hot and bubbly (stir occasionally to ensure heated through). Throw a couple of handfuls of cheese on top, back in the oven to melt thoroughly, and TA DA — hot crab dip!

SAMSUNG

Is it bread? Is it cake?

So I had some leftover coconut milk after last week’s pumpkin curry, and I was NOT going to let it waste (it was light coconut milk so I also was concerned about freezing it). I wasn’t in the mood for another savory curry, I wasn’t making ice cream anytime soon, I don’t really do smoothies, I wasn’t planning to fire up the grill (coconut marinated chicken skewers?) …in my mind, when in doubt, go sweet.

I thought about the consistency of coconut milk. It’s really thick, so I was curious how it might substitute for buttermilk. So I went back to this basic muffin/sweet bread recipe I’ve been playing with, and subbed out the buttermilk for equal parts coconut milk. Inspired! This bread is so moist, and a little dense, almost like a pound cake (I do think that’s the buttermilk-to-coconut-milk sub). The coconut flavor is very subtle — but it’s there. I had grabbed mandarin oranges because they were in the pantry — they turned into little pops of juiciness throughout the bread — nice level of sweetness since the bread is only moderately sweet. Overall — a home run!

Mandarin Orange Coconut Bread, adapted from Heather Christo Cooks’ Lemon Blueberry Streusal Muffins

2 1/2 cups flour
2 1/2 teaspoons baking powder
1/2 teaspoon salt
1/2 cup butter, melted and cooled slightly
1 cup sugar
2 eggs
2 tablespoons orange liqueur
1 cup light coconut milk
1 cup mandarin orange sections, drained, juice discarded

Preheat oven to 375F. Prepare 9″ x 5″ x 3″ loaf pan by spraying with baking spray, lining with a parchment sling, and spraying the sling with baking spray (see photo below). NOTE: Do not use a smaller pan — this produces a HIGH loaf even in this large bread loaf pan!

In a small bowl, whisk together the flour, baking powder, and salt (I like to use the whisk from my stand mixer as a hand whisk for this). Set aside.

In a stand mixer fitted with a paddle beater, mix the butter, sugar, eggs, and orange liqueur until well combined.

STOP mixer. Dump in half of the dry ingredients and mix on low until incorporated.
STOP mixer. Add the coconut milk and mix on low until incorporated.
STOP mixer. Add the second half of the dry ingredients and mix on low until incorporated.

Remove the bowl from the mixer stand and fold in the orange segments by hand.

Pour the batter into the prepared pan. Bake the loaf at 375F for 30 minutes. Rotate the pan, lower the heat to 350F, and cook another 25 to 35 minutes until golden brown and a toothpick inserted into the center comes out clean (or with only a few crumbs).

SAMSUNG

Allow to cool to at least WARM before slicing! I know you won’t be able to wait until room temperature, but if you slice too soon, it will crumble to bits (good for the dog, not so good for you).

SAMSUNG

SAMSUNG

Imitation is the sincerest form of flattery …

So I had almost 1 cup of fresh NJ blueberries leftover from the weekend. Past experience indicates blueberries do NOT make good margaritas, so it seemed I needed to go in a solid direction. I saw a delicious recipe on a blog I follow, but true to form, I didn’t have enough blueberries to make the full recipe (nor a lemon, nor the brown sugar). So I did what I usually do — make a substitution or two.

Generally when I deviate from a recipe, it’s not so much that I feel the need to IMPROVE upon it, but rather, I’m missing one or more ingredients. Sometimes it’s a home run, sometimes just a lame imitation. I think this one is a good solid double. We’ll see what the Culinary Guinea Pig says :)

Since I was a hair light on blueberries, and didn’t have the brown sugar to make the streusel, I looked around for something to amp up the flavor alongside the blueberries — and found the bottom of a bag of crystallized ginger in the top of my pantry. It was the perfect POP of flavor that I was looking for … I hope you agree!

Blueberry Ginger Muffins, adapted from Heather Christo Cooks’ Lemon Blueberry Streusal Muffins

1 1/4 cup flour
1 1/2 teaspoon baking powder
1/2 teaspoon salt
2 – 3 tablespoons finely chopped crystallized ginger
1/4 cup canola oil
1/2 cup granulated sugar
1 egg
2 tablespoons bottled lime or lemon juice
1/2 cup buttermilk
1 cup fresh blueberries

Preheat the oven to 375 degrees. Prepare 10 standard muffin cups with paper liners (have one or two extra liners just in case).

In a small bowl, whisk together the flour, baking powder, and salt (I like to use the whisk from stand mixer as a hand whisk for this). Toss in the ginger pieces and use your fingers to ensure they are separated and lightly coated with flour. Set aside.

In a stand mixer fitted with a paddle beater, mix the oil, sugar, egg, and citrus juice until well combined.

STOP mixer. Dump in half of the dry ingredients and mix on low until incorporated.
STOP mixer. Add the buttermilk and mix on low until incorporated.
STOP mixer. Add the second half of the dry ingredients and mix on low until incorporated.

Remove the bowl from the mixer stand and fold in the blueberries by hand.

Fill the lined muffin cups about 2/3 full of batter. Bake the muffins at 375 degrees for 12 minutes. Rotate the pan and cook another 4 to 6 minutes until light golden brown and a toothpick inserted into the center comes out clean (or with only a few crumbs).

Makes about 10 muffins.

SAMSUNG

Om nom nom nom.

SAMSUNG

Ziploc Pumpkin Curry

Confession: my freezer is full of ziploc bags of goodies. Today: rolled up raw bacon slices (3 to a bag), bread crumbs, chopped celery, whole habaneros, sad little carrot chunks, peeled ginger hunks, and even some cooked pumpkin puree. Previous finds have included lamb jus and chipotles en adobo. It’s best when I remember to label the bags, because those two looked pretty much the same when frozen. It makes perfect sense to me — who uses a whole can of chipotle en adobo in a single recipe? Leftover bags of potato rolls from an office luncheon? Pulse them in the food processor and freeze the crumbs for future meatloaves. I chop and freeze celery and carrots to have them ready-to-go to start a soup or enrich a stock. In the case of the pumpkin, I used only part of a can so I put the remainder away for another creation.

So sometimes these bags lie untouched for months (I’ve started dating them when I remember to label them). And then I’ll be digging for the walnuts that I KNOW are in the back of the freezer, and I’ll come across something forgotten, which gets my hamster going. Which is what happened with the pumpkin. I had bought chicken tenders a couple of days ago since they were on sale and we are in the middle of a heat wave and I knew they would cook FAST. But then I came across the pumpkin, and it’s been turning over in my mind, and I knew I didn’t want to make pumpkin bread (in a heat wave?), and I was pretty sure I had curry paste and coconut milk in the pantry, and Thai basil in the garden, and so the idea of a pumpkin curry began to form in my imagination. I also found an additional freezer surprise — the last of a bag of cubed butternut squash — SCORE!

Thai cuisine in general feels “light” to me, even with the coconut and spices. We eat a Thai-inspired dish probably once a week in the summer. This curry is lighter than what I usually make — which is more appropriate to this heat.

Pumpkin Curry
Serves 4 to 6

SAMSUNG1 1/2 tablespoon canola oil
1 large shallot (or 1 small onion), sliced thin
1/2 can (~2oz) Panang curry paste (see photo)
1.5 lbs chicken tenders
1 can (14oz) light coconut milk
1 cup low sodium chicken broth
2 cups cooked pumpkin puree
1/4 to 1/2 teaspoon fish sauce, to taste (see photo)
1/2 to 1 tablespoon lime juice, to taste
1 1/2 cup frozen butternut squash cubes, thawed
Steamed rice
Thai basil leaves for garnish

Heat a large pot or skillet over medium heat. Add canola oil then shallots. Stir the shallots until they soften slightly. Add the Panang curry paste and cook it in the oil with the shallots until fragrant, just a minute or two.

Add the chicken chunks and stir to ensure they are fully coated with the curry paste. Cook until the chicken’s outside is opaque and it is about 50% cooked. Takes maybe 5 minutes, but that will vary depending on white or dark and the size of your chunks.

Add the coconut milk, chicken broth, pumpkin puree, fish sauce, and lime juice. Stir gently to incorporate. Taste for seasoning and add a touch more fish sauce and lime juice if needed. Allow to simmer gently, stirring occasionally, until the chicken is ALMOST done — maybe another 8 to 10 minutes. I check doneness by feel, but feel free to use a meat thermometer and probe the largest chunks.

Add the squash cubes — they will need just 3 or 4 minutes in the curry to come up to temp.

Serve over steamed rice. Garnish with the Thai basil leaves.

SAMSUNG

NOTES:

I had Penang curry paste in the cupboard, but I think red curry paste would work as well.

The chicken won’t brown, like in a saute, but you’ll see that the outside firms up and changes color. It is still raw inside but that’s okay because it will continue to cook while the sauce simmers.

Boneless, skinless breasts or boneless, skinless thighs would substitute just fine for the tenders. I think it would be fab with shrimp, too. I’d saute the shrimp for just a minute or so with the curry paste and add the butternut squash cubes with the liquids and adjust the cook time down considerably.

The Thai basil leaves are more than garnish — stir them into your bowl of curry where they will wilt slightly. They add a lovely anise flavor to the curry and really enhance the mild pumpkin flavor.

My cook times are approximate — I cook by feel, not the timer. Sorry :(

SAMSUNG

Time for Thai?

With the weather warming, our palates naturally turn to lighter fare.  This is a nice dish for this transition from winter to summer (you know, the DC spring that lasts 3 days). You can serve it warm over steamed rice and the next day, serve the cold leftovers over greens. I discovered this recipe years ago on the Internet SOMEWHERE, but I’ve adapted it to my taste and kitchen. My apologies to the original poster for lack of attribution.

SAMSUNG

This was the dish for which I first purchased fish sauce. Fish sauce is a Asian condiment made from fermented, salted fish (you probably don’t want the details). Fish sauce can be found in American grocery stores as well as international markets. I have to be honest, it is VERY pungent and VERY salty — a little goes a long way. I use it in all sorts of dishes where I want to add richness (“umami”), like a chili or a stew, because no “fish” flavor really comes through — just salty and savory. Not so different from using anchovies or anchovy paste as a base for a pasta sauce. If you’ve never used it before, this is a good “Intro To Fish Sauce” dish.

Thai-Inspired Beef Salad

1 medium red onion (or 1/2 a large red onion — to taste)
5 tablespoons lime juice (I use bottled Nellie’s)
2 tablespoons fish sauce
1/4 to 1/2 teaspoon chili flakes
Bunch of cilantro
1.5 pounds flank steak; alternatives are skirt steak or a well-trimmed 3/4″ thick London broil
2 tablespoons toasted rice powder

Optional Garnish(es): Chopped dry roasted peanuts, cilantro leaves, mint leaves

I like to pull meat from the fridge about 1/2 hour before I think it’s going to hit the grill (or pan). I let it rest on the countertop, pushed back out of reach of the dog, of course. For this dish, it takes me about 1/2 hour for prep, so I pull the meat out at the beginning as I’m pulling the other ingredients.

Start by making your toasted rice powder: Put 2 – 4 tablespoons of raw uncooked white rice (I use jasmine) in a dry skillet heated over medium to medium-high heat. Watch it, shaking the pan occasionally, until the rice starts to toast and take on color. Now, shake the pan often to keep the rice moving — it can go from light brown to burnt rather quickly! Take it to a light-to-medium (golden) brown and pull from the heat. Allow to cool and then use a blender, spice grinder, or food processor to process to a coarse powder.

Slice your onion in half root to stem. Pull the papery peel off each half. Slice the onion vertically into thin strips – root to stem. Separate these slices into a bowl of ice water while you prepare the rest of the ingredients. This ice water bath will mellow the bite and crisp them up.

In a small non-reactive bowl, mix the lime juice, fish sauce, and chili flakes. Set aside.

Rinse your cilantro and drain on a paper or dish towel. Pull the individual leaves off each stem until you have about a cup of lightly packed leaves. It’s okay if you have bits of the tender top stem, but try not to get too much lower stem. Set aside.

DO NOT SEASON the meat — the dressing will have sufficient salt, thanks to the fish sauce. Cook your meat to medium-rare to medium. You want a nice crust on the outside and some pink juiciness still in the middle. Ideally, you would do this on a charcoal grill, with a gas grill being a close second. No worries — a quick sear in a hot skillet on the stovetop works too. I’d put a teaspoon or two of a neutral oil, like canola, in the hot skillet (less for flank or skirt steak, more for a London broil). Lay the meat in and DON’T touch it. After 5 – 8 minutes, the meat will naturally release from the pan, signifying it’s ready to be turned. Flip once and sear the other side. Again — the meat will naturally release from the pan when it’s nice and crusty. Use a meat thermometer if you are concerned about the level of doneness.

Whether grilled or pan-seared, let the steak rest 8 – 10 minutes after pulling from the heat.

Put the cilantro leaves in a large bowl. Drain the onions, pat dry, and add to the bowl. Slice the meat thinly across the grain and add to the bowl. Pour the lime/fish/chili dressing over the meat. Sprinkle with a tablespoon or two of toasted rice power and toss it all together. Garnish with the peanuts, additional cilantro leaves, or mint leaves, as desired.

SAMSUNG


Dork Note: I had the leftovers over greens for lunch, with every intention of taking a photograph. Unfortunately, I didn’t recall that intention until halfway through the salad — sorry.

SAMSUNG

Cookies are Networking not Stalking, right?

So I’ve been following Heather Christo’s blog for a few months or a year or so. I’ve made a few of her recipes, generally with success, but mostly I use her blog for inspiration for flavor profiles and to validate a recipe’s proportions, cooking temp and times, etc. (yes, I analyze recipes for formula errors just as I would an Excel spreadsheet). Heather recently published a cookbook and is on her cross-country book tour. She’s going to be at a book signing tonight here in the DC area, so I grabbed my copy (that I nabbed as soon as it was available on Amazon) and am headed out this evening to get it signed.

So earlier this week, as I was asking about one of her recipes (ingredient analysis, **sigh**), I said I was going to her signing and asked “are we SUPPOSED to bring cookies to the signing?” She said she’d love it, so I whipped up a batch of these ROCKING oatmeal cookies last night with a dozen set aside for Heather. It’s networking, right? Not stalking?

Criminal concerns aside, this has become my go-to recipe for oatmeal cookies. I **LOVE** that the butter is melted, because sometimes I forget to put the butter out ahead of time, or I bought it ON the way home, or the kitchen is warm and the butter gets too soft and then my cookies get greasy. I try to be judicious about making specific product recommendations, but here, this specific Trader Joe’s fruit and nut mix really fits the bill. I’ve also made the cookies without the chocolate chips, and it’s a fine cookie, but the mini chips slip these little nubbins of chocolate in between the bigger chunks of nuts and really take it the next level. I bet white chocolate would be pretty divine too!

Rockin Oatmeal Cookies, adapted from Bluebonnets and Brownies’ Dark Chocolate, Cherry and Pistachio Cookies

Makes about 50 cookies.

1 1/4 cups unbleached all-purpose flour
1/2 teaspoon baking powder
1/2 teaspoon baking soda
3 cups old-fashioned oatmeal
1 teaspoon salt
16 tablespoons butter, melted (2 sticks)
2 tablespoons canola oil
1 cup granulated sugar
1 cup light brown sugar
2 large eggs
1 tablespoon ginger liqueur
2 cups Trader Joe’s Macademia/Almond/Cranberry/Ginger Trek Mix
1 cup mini chocolate chips

Measure out 2 cups of the nut mix. I find the cranberries stick together — use your fingers to separate them from each other. Pull out the ginger chunks and chop finely (1/8″ to 1/4″ mini chunks). Roughly chop the macadamias and almonds as they tend to be whole. Put this aside (I know this step is slightly obsessive, but you don’t want clumps of cranberry or ginger-less cookies and you SO do not want to break a tooth on a whole almond).

In a medium bowl, combine flour, baking powder, baking soda, oatmeal, and salt. Whisk together to combine and aerate, then set aside.

Melt the 2 sticks of butter and allow to cool slightly. Combine butter, oil, and both sugars in the bowl of a stand mixer. Mix on low to medium speed until well combined. Add eggs one at a time, mixing well after each addition. Add liqueur and mix again.

Incorporate the flour mixture a little at a time on LOW speed until well mixed in.

Add in nut mix and chocolate chips. Mix by hand or on LOWEST speed with the mixer until the add-ins are well combined and mixed through the dough.

Chill the dough for 20 minutes. While it’s chilling, preheat the oven to 350F.

Place golfball-sized dough balls on a parchment lined cookie sheet – roughly 8 to a sheet (I do two rows of three with a row of two in between — I REALLY should have taken a picture of that). Bake ONE tray at a time for 9 minutes, rotate pan, bake for another 3 or 4 minutes. I keep the dough in the fridge in between batches.

Remove from the oven and allow to cool for a couple of minutes on the sheet before removing to a cooling rack or countertop with wax paper. Eat several while warm. Allow the rest to cool completely before boxing or bagging.

*****

SAMSUNG

[photo credit: Heather’s sister-in-law Natalie]

p.m. update:  So, Heather is as gracious and natural in person as you might expect from reading her blog. And about 8 feet tall and slender as can be and totally ROCKING some hot platform pumps (I should have taken a picture of those instead, right?).This was a small, intimate venue, so I got a chance to talk with her and her sister-in-law Natalie for a bit (Natalie was kind enough to take this photo as well as the Instagram version). I recommended they go get dinner at El Pollo Rico for authentic Peruvian charcoal chicken. Of all the awesome restaurants in Arlington, yes, we talked about Peruvian chicken!

Heather seemed to like the cookies — yeah for me!! Because I’m such a dork — those are my cookies right next to HER cookbook in the picture. If you’ve not visited her site, it’s well worth a visit. I can personally recommend her recipe for Lemon Summer Squash Bread.

SAMSUNG

And then there were four … strawberry-rhubarb MUFFINS that is

I know they ain’t much to look at. These strawberry-rhubarb muffins schooled me in rhubarb. I watched my grandma cook up rhubarb for pie — she must have poured half the sugar bag in, it seemed. I truly had NO idea you could slice them RAW into a fairly basic batter and turn out something that wasn’t merely edible, but DELECTABLE. Moist, tender crumb, well-defined tastes of strawberries AND rhubarb (which surprisingly sweetened up under cooking), not too sweet, not too tart — I’m a convert to rhubarb!

There are only four muffins in the picture because we already had one apiece. You know, taste testing. Thumbs up from the Culinary Guinea Pig.

Strawberry Rhubarb Walnut Muffins, adapted from Smitten Kitchen’s Strawberry Rhubarb Pecan Loaf
Makes six “Texas-sized” muffins

3/4 cup light brown sugar, packed
1/3 cup canola oil
1 large egg
1 tablespoon rum
1 tablespoon ginger liqueur
1 1/4 cup unbleached all-purpose flour
1/2 teaspoon salt
1 teaspoon baking soda
1/4 cup nonfat greek yogurt
1/2 cup diced rhubarb (heaping)
1/2 cup diced strawberries (heaping)
1/2 cup chopped walnuts (heaping)

Preheat oven to 350°. Line the muffin tin with paper liners, OR, grease them well with solid shortening.

In a big bowl, beat or whisk together the brown sugar, oil, egg, rum, and ginger liqueur (I used my stand mixer because I was feeling lazy). In a separate bowl, combine the flour, salt and baking soda; stir. Add dry ingredients to first mixture with the yogurt and combine. Stir in rhubarb, strawberries, and walnuts (lowest speed if using a stand mixer or you will get MUSH!!). The batter will be very thick!

Spoon evenly amongst the muffin wells. Bake at 350° for about 30 minutes, or until a wooden pick or cake tester inserted in center comes out clean. I would check at 25 minutes and then at 3 to 5 minute intervals thereafter.